Introduction
Background of the Report
This project was the culmination of eight labs that provided the essential background to develop a fully autonomous, line-following robot for the semester’s end competition. This report details the development and implementation of a control system and Convolutional Neural Network (CNN) enabling the robot to detect and read clue plates, navigate a predefined track and avoid obstacles. The labs were very useful! For a personal logbook of all labs and related thoughts, you can click here.
Contribution Split
Richard Helper: PID-based line following and obstacle avoidance.
Amjad Yaghi: CNN-based clue detection, visual processing of clue boards, UI development, emergency teleportation strategy for competition.
Software Architecture
Software architecture used on competition day
Discussion
Robot Driving Method
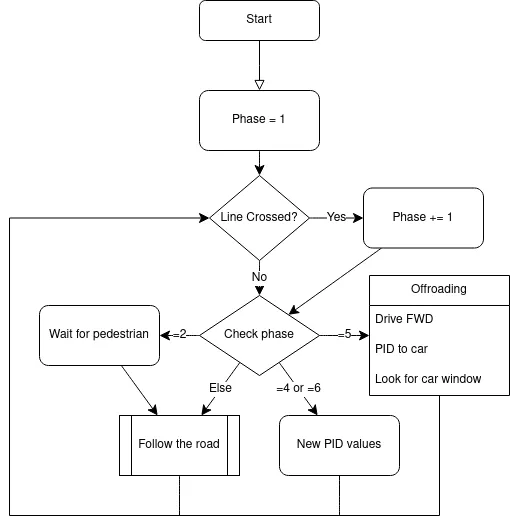
The planned driving module used PID, a state machine, and several specific behaviours to make its way through the obstacle course. Unfortunately, we were not able to integrate it with the clue detection in time, and so were forced to go through with our emergency controller detailed at the end of the section.
Contour Detection and Basic PID
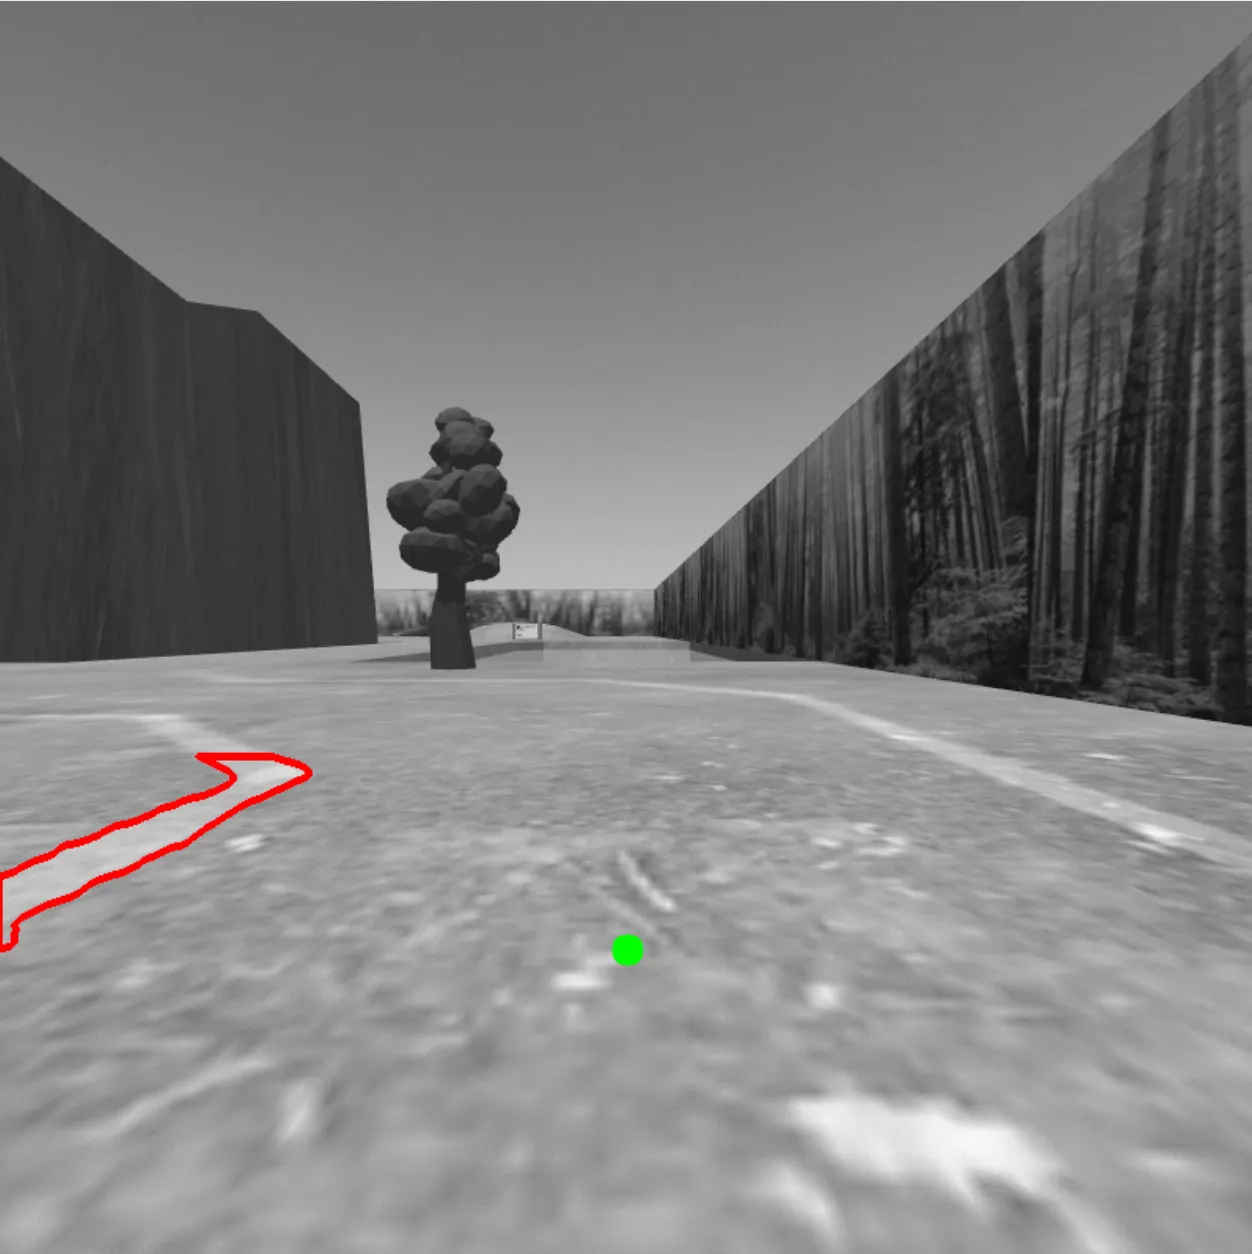
Due to the roundabout in the middle of the on-road section, the robot needed to be biased toward turning left so as not to collide head on with the truck. There was also the issue of noise in the middle of the road during the dirt phase. To counteract these issues, the PID was based off the centre of the leftmost contour above a certain perimeter threshold, using an adaptive offset towards the opposite end of the screen that grew smaller as the marker was placed closer to the horizon. See the figure below for an example.
Staging
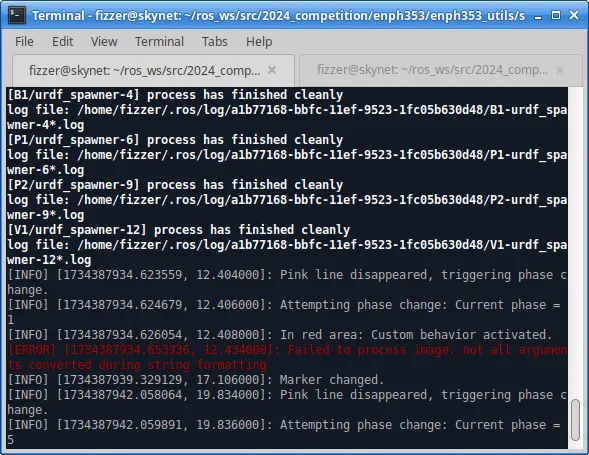
As the robot drives, it encounters different scenarios marked by lines across the road. There is a red bar that marks the beginning of the pedestrian section and pink ones that mark the transition between the paved road, dirt road, offroad, and hill sections. The drive module uses a state machine to account for this. Whenever one of these lines is detected – that is, the bottom 10% of the screen has a certain number of pixels that satisfy the red-pink masking – and then disappears, the next state is initialized. This usually means swapping image processing and control algorithms, as is detailed later in this section.
NPC Avoidance
Of the three NPCs, the pedestrian was the only one that the robot would ever hit. The truck acted as a contour in such a way that the PID automatically avoided it, and Baby Yoda was navigated around entirely.
To dodge the pedestrian, the staging system was put to simple use. Upon crossing the red line, the robot swaps to phase 2, and waits for the marker to shift dramatically. As the pedestrian crosses the left side of the road, it would disrupt the contour and cause this shift. The robot would then resume its normal behaviour.
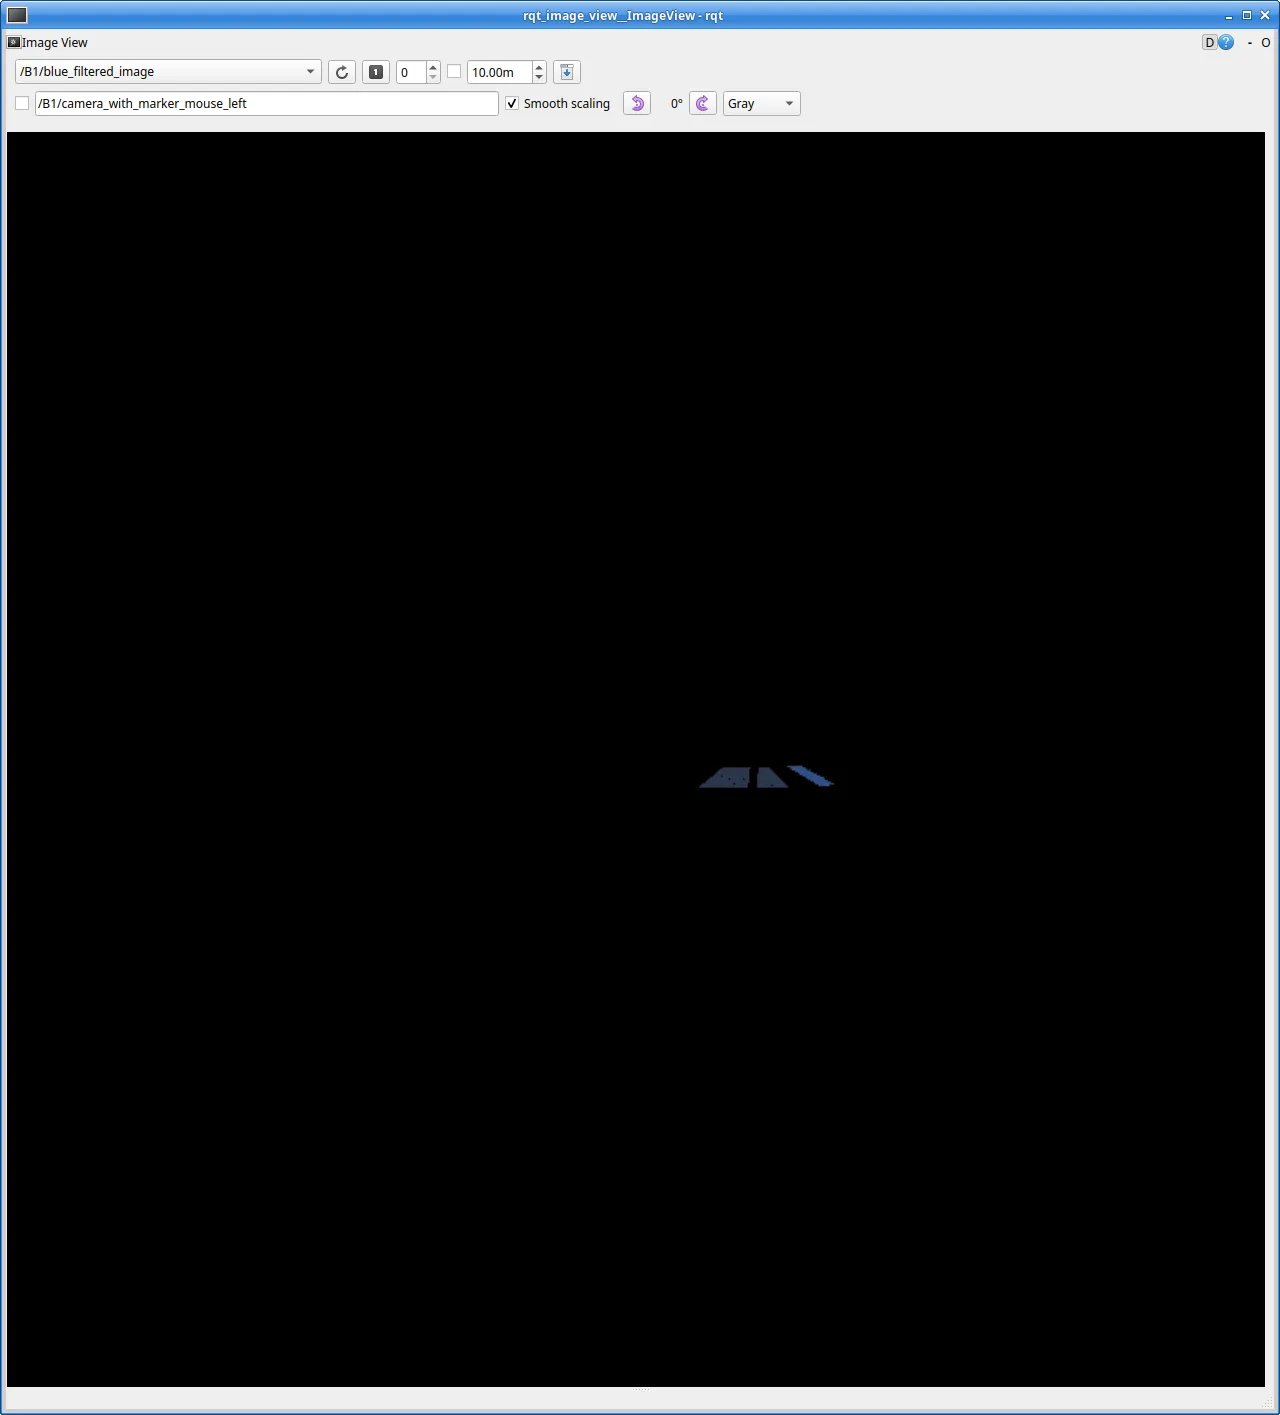
Offroading
The offroad section consists of five simple phases. First, the robot drives forwards at an angle towards the hill for a set period of sim time. It’s not particularly sensitive as to where the robot ends up, so this worked fine. Then the robot would turn until it detected the windows of the car through the blue mask shown in the figure below. These windows are a very particular shade of blue, so it doesn’t get confused by the clue boards. It then PIDs directly toward the centroid of these pixels until they make up a certain percentage of the screen. Finally, it turns right until the pink line is centred in its view, thus catching a view of the clue, and drives towards the tunnel.
Emergency Controller
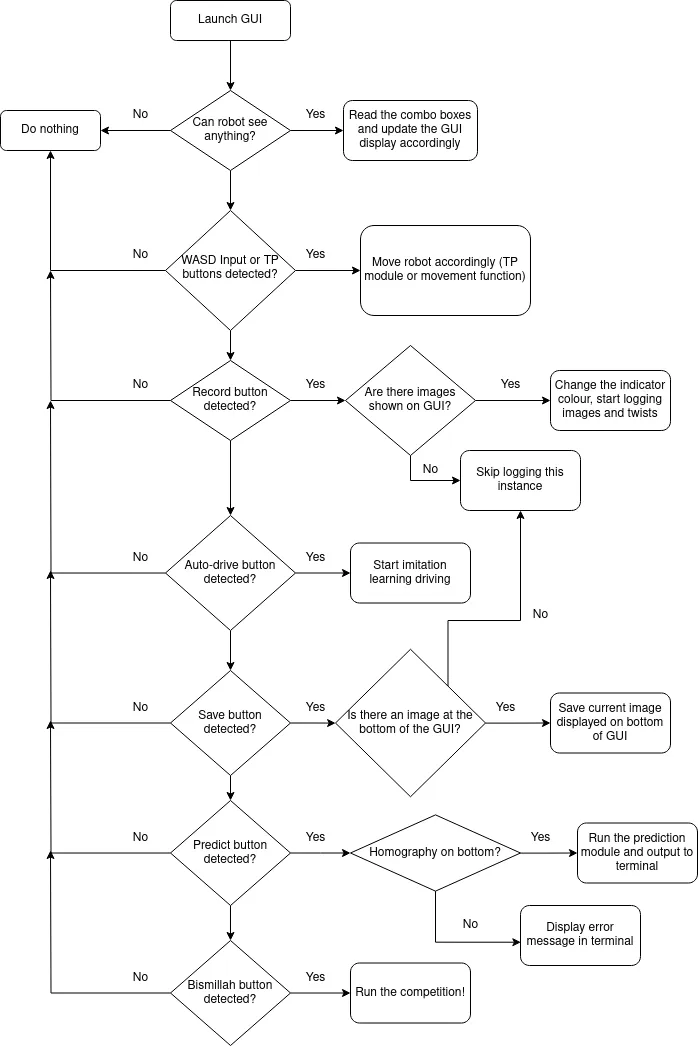
The controller used in the competition does the following:
Drive for a predetermined time in predetermined steps, wait for the CNN to report a board, and then continue its circuit. This circuit includes teleportation to each staging line.
Here is a link to the python file which contains this sequence.
Clue Plate Recognition Module (CNN)
Data Acquisition
All data was acquired manually by going into the simulation after changing the clue boards. I would drive around and screenshot them using the GUI. Here’s a demo of what that looked like:
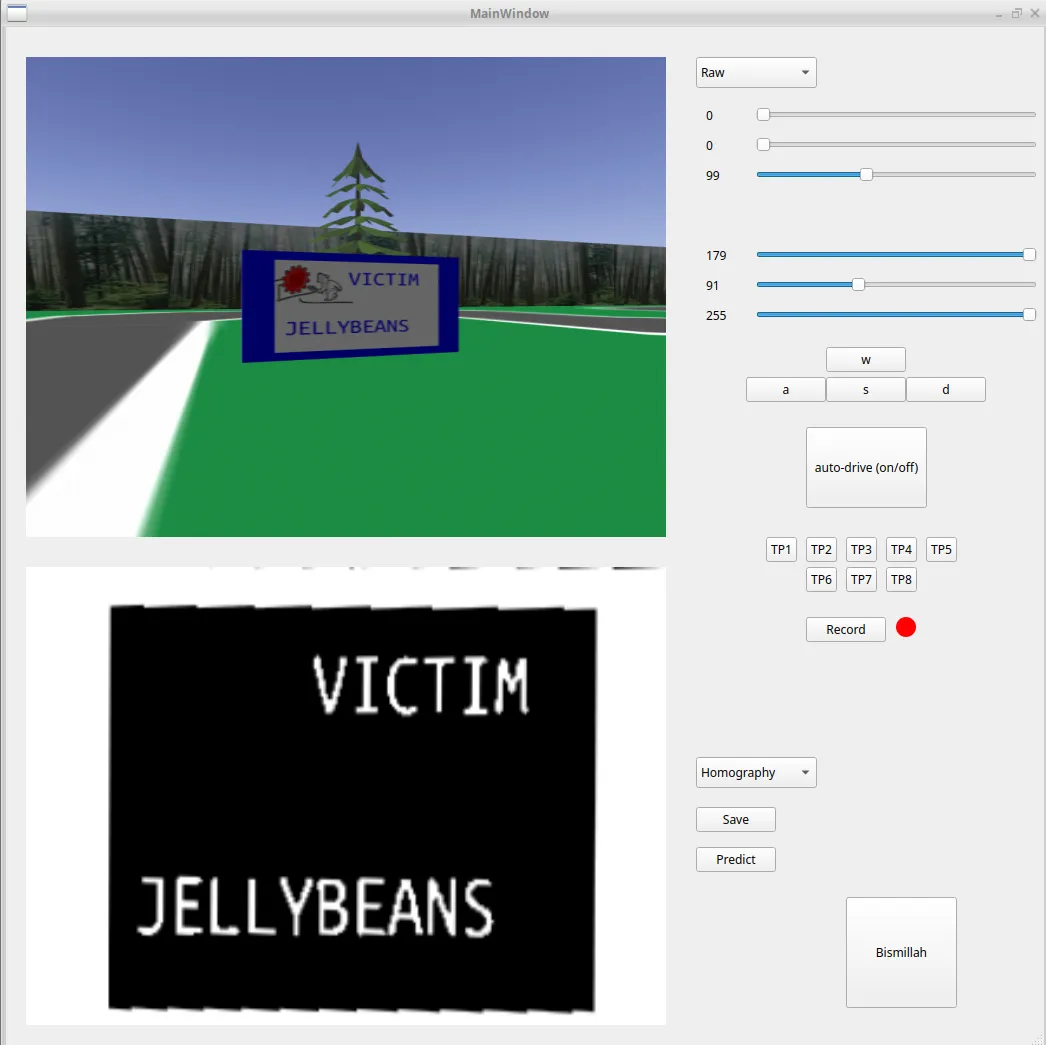
This was done tens of times – and although time consuming – gave us very transferrable (as in: relevant to what we would see on competition day) training data. The GUI has drop-down menus that allow you to control what you want to see in the display labels. This was very useful for testing how much to threshold, erode, dilute, and process images in general.
Image Processing
Images were then meticulously broken down into contours and stretched to get clear pictures of each letter for the CNN to train on / predict. You can read the exact steps here, in the prediction module of the repository. In short, images were cut in half and a contour box was forcefully drawn around the individual letters. If there was overlap, contours were limited to a certain size and would forcefully split into the best number of boxes in order to separate the letters. There is also a more digestible version on Google Colab which you can play around with and test for yourself.
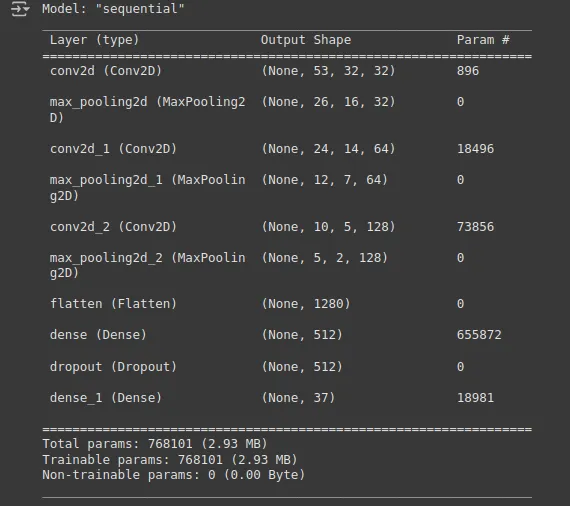
Model Architecture
The architecture we used for training was inspired by previous work we did in our labs in class, which you can read more about here. The following is an image of the model summary.
Training on Images
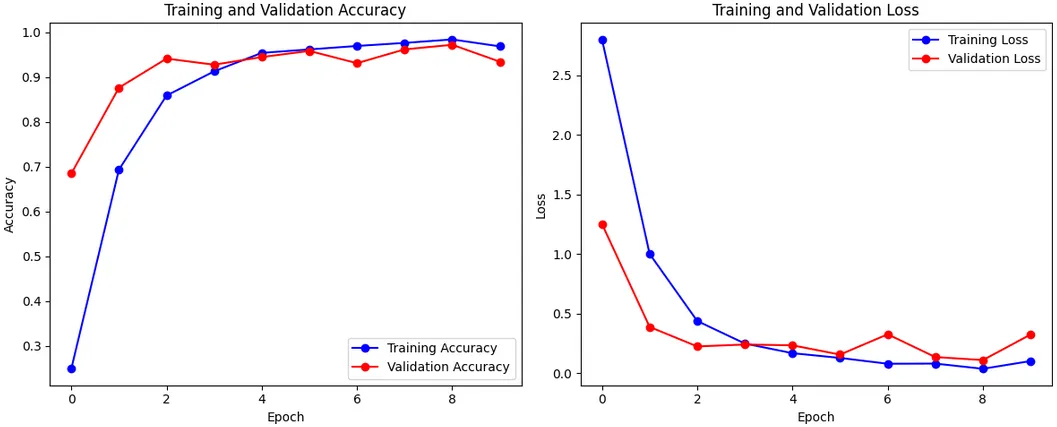
Since we did not do any data augmentation (no artificially generated data based on what we had already), we needed as much of our dataset used for training as possible. As such, the strategy was to monitor training using an 80-20 training-validation split, and once it was satisfactory, to remove the validation set entirely and train on the complete set of images.
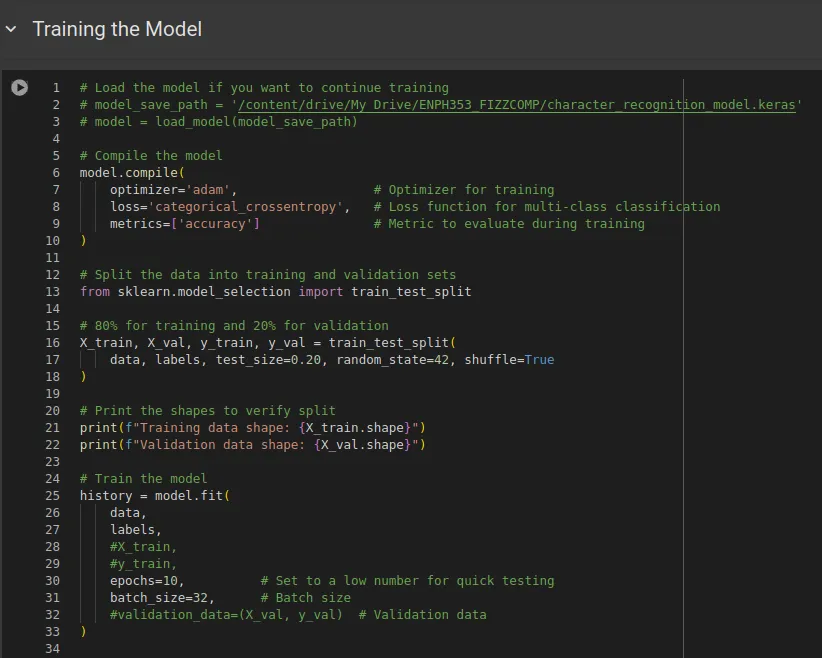
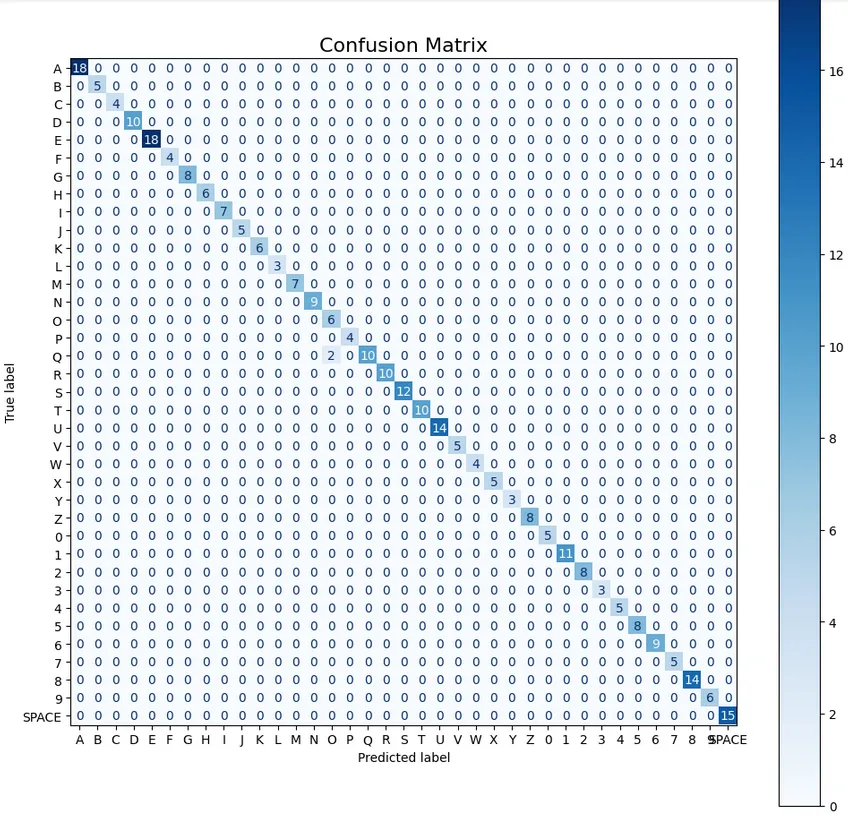
Notice in the figure above, x_train and y_train are commented out, this is because we were using all letters to train our final competition model. Below is a sample of what our accuracy, loss and confusion matrix looked like when we actually had a split:
Failure Cases
Occasionally, when segmenting the letters, there is enough overlap to cause a failed prediction. There was an attempt to solve this by intentionally training on overlapped images, however not enough was manually captured. Above, we discussed our performance during competition. Unluckily, one of our predictions failed as a result of this overlap; however, this is a rare event. You can view the individual letters that were used to train the model here. You may notice some of them have a lot of overlap (by design).
Conclusion
Performance During Competition
The robot performed almost as well as designed during competition. It correctly reported four different clues, teleported three times, and crossed the line once to a total of 18 points. Due to one misspelled clue, we were not able to maximize our points, but there was no catastrophic malfunction.
Unadopted Other Attempts
Notice, in the figure which shows the GUI, that there is a button labeled “Record” with a red light next to it. This was because due to conflicts integrating driving and clue detection together, I tried to quickly create an imitation learning model to navigate the robot. The record button would take screenshots every 100ms and create a CSV file which mapped the current linear and angular velocity of the robot to the image. Images were then fed into another CNN with very similar architecture to the one used for training on letters. Surprisingly this method had accurately navigated the first segment of the road up to the second clue board. However, it became quickly apparent that we did not have the necessary compute (shoddy laptop :/) in order to use an imitation learning model in time for the competition, thus it was scrapped and the emergency teleportation method was used instead.
Improvements for Future
The primary area in need of improvement is the integration of clue detection and driving. We would have used a very wide angled camera so that the clues could be seen without stopping, and altered the homography such that it could undo the resulting distortion. This would also include getting the robot to reach the top of the hill and ironing out the CNN overlap issue. Secondly, there is a lot of potential to optimize the usage of nodes to separate actions which needed to occur simultaneously on the robot.
Appendices
Referenced Material
All referenced material can be found on the ENPH 353 website. There, you will find access to eight labs which helped us in various ways for this project.
Here’s a link. It will likely update as months pass.
Notable People
We would be remiss not to mention Daniel Song, Michael Khoo and Ebrahim Hussain who gave input regarding their previous experience in this course.
Lastly, many discussions were had with Ella Yan (a colleague taking the course) particularly regarding image processing and how to implement an imitation learning model. We would like to give our flowers to her and her teammate Nora Shao for managing to implement their imitation learning model with severe time constraints.
ChatGPT Usage
ChatGPT was used to help implement ideas that we already had, and for debugging. Here is an example of how ChatGPT was used to help us troubleshoot making predictions.
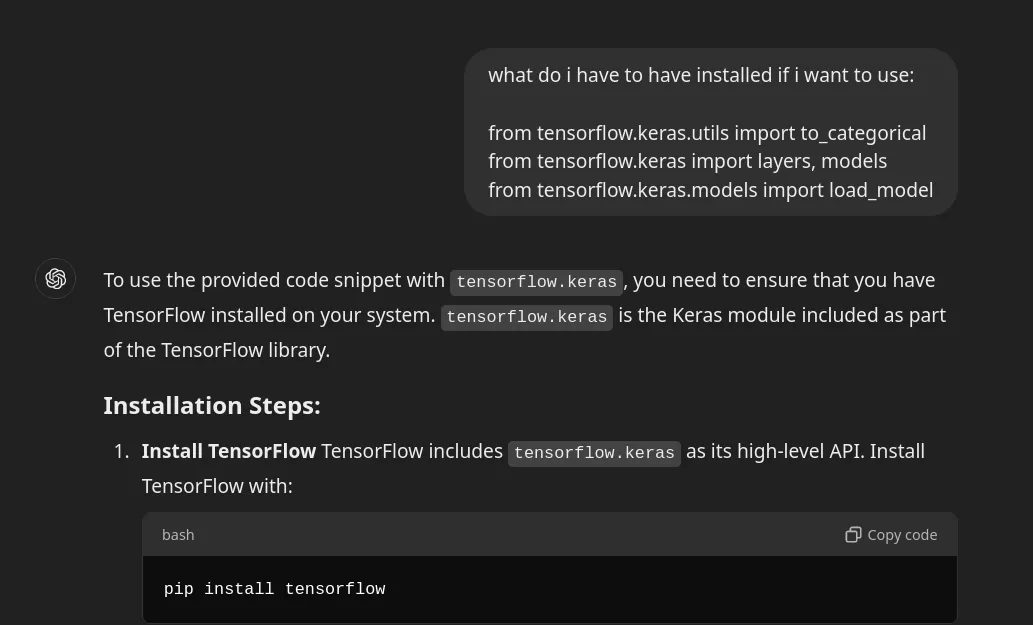
In fact, this was a notable conversation with ChatGPT, as it helped to reveal that there was a mismatch between the version of the model in Google Colab and the one used locally! (Took a while to figure out what was wrong.)